Understanding the Importance of Finger Taping in Volleyball
Alright, folks, let's talk about a topic that's as crucial as it is comical: finger taping in volleyball. Now, I know what you're thinking, 'Why on earth would I need to tape my fingers? Are they planning on staging a tiny circus during the game?' Well, my friends, the truth is that finger taping is no laughing matter. When you're spiking that ball with the force of a thousand suns, your fingers can take a beating. So, to avoid looking like a human pretzel, it's time to master the art of finger taping. Picture this: you grab your trusty roll of athletic tape, wrap it around your fingers like a mummy, and voila! You've just transformed your delicate digits into indestructible weapons of volleyball destruction. So, whether you're a seasoned player or a newbie, remember, finger taping is the secret to keeping your hands intact and your opponents in awe.
Preparing for Finger Taping: Essential Tools and Materials
An interesting fact about taping fingers for volleyball is that the technique used to tape fingers is known as 'buddy taping.' This method involves taping an injured finger to an adjacent healthy finger for support and stability. By taping the injured finger to a buddy finger, it helps distribute the pressure and prevents further injury while still allowing some flexibility for optimal performance on the volleyball court.
Alright, my fellow volleyball enthusiasts, let's dive into the world of finger taping preparation. Before you embark on this epic journey of securing your fingers like a pro, you'll need a few essential tools and materials. First up, grab yourself a roll of athletic tape, the superhero of all tapes. Next, make sure you have a pair of trusty scissors, because let's face it, tearing tape with your teeth is not a good look. Now, here's where things get interesting. You'll need a pre-taping ritual, like a secret handshake with your tape. Maybe give it a pep talk or a motivational speech to get it in the right mindset. Finally, don't forget to have a sense of humor, because let's be real, you're about to embark on a journey that involves wrapping your fingers like a mummy. So, gather your tools, embrace the absurdity, and get ready to conquer the world of finger taping in volleyball.
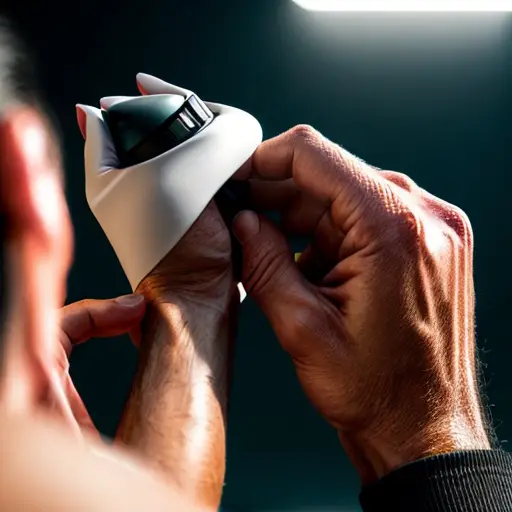
Step-by-Step Guide to Proper Finger Taping Techniques

Alright, my fellow volleyball warriors, it's time to get down to business and master the art of proper finger taping techniques. Follow this step-by-step guide, and you'll be ready to rock the court with fingers that are as secure as Fort Knox.
Step 1: Clean and dry your hands. We don't want any dirt or sweat interfering with our tape job. So, grab a towel, wipe those hands clean, and let's get started.
Step 2: Start with the anchor. Take a strip of athletic tape and wrap it around your wrist, making sure it's snug but not too tight. This will serve as the foundation for the rest of the taping process.
Step 3: Protect those knuckles. Cut a small piece of tape and place it over the knuckles of the finger you're taping. This will provide an extra layer of protection against those hard-hitting spikes.
Step 4: The crisscross magic. Now, it's time to create a crisscross pattern. Start by wrapping the tape diagonally from the base of your finger to the tip, then wrap it back down in the opposite direction. Repeat this process until you've covered the entire finger, making sure the tape is snug but not too tight.
Step 5: Secure the tape. Once you've reached the end of your finger, cut the tape and secure it in place by wrapping it around the anchor on your wrist. Give it a gentle pat to make sure it's nice and snug.
Step 6: Repeat for the other fingers. Remember, volleyball is a team sport, and your fingers are a team too. So, repeat steps 2 to 5 for each finger that needs taping.
And there you have it, folks, a step-by-step guide to proper finger taping techniques. Now, go forth, unleash your inner volleyball beast, and let those taped fingers work their magic on the court.
Tips and Tricks for Maintaining Finger Taping during Volleyball Matches
Fun fact: Did you know that taping your fingers for volleyball not only helps prevent injuries, but it can also improve your performance? By taping your fingers together, you create a larger surface area for ball contact, giving you better control and accuracy when setting, spiking, or serving the ball. So, next time you hit the court, give finger taping a try and see how it enhances your game!
Alright, my fellow finger-taped volleyball warriors, let's talk about some tips and tricks for maintaining that precious tape during intense matches. First and foremost, make sure you have extra tape on hand. Trust me, you don't want to be caught in the middle of a game with a loose or damaged tape. Secondly, keep an eye on your fingers during breaks and timeouts. If you notice any signs of the tape coming loose or unraveling, take a quick moment to re-tape and reinforce those fingers. Lastly, embrace the power of sweat-resistant tape. Look for tapes specifically designed to withstand the sweat and heat of the game, ensuring that your finger taping stays intact and reliable throughout the match. So, my friends, remember these tips, stay vigilant, and let your finger taping be the unsung hero of your volleyball victories.